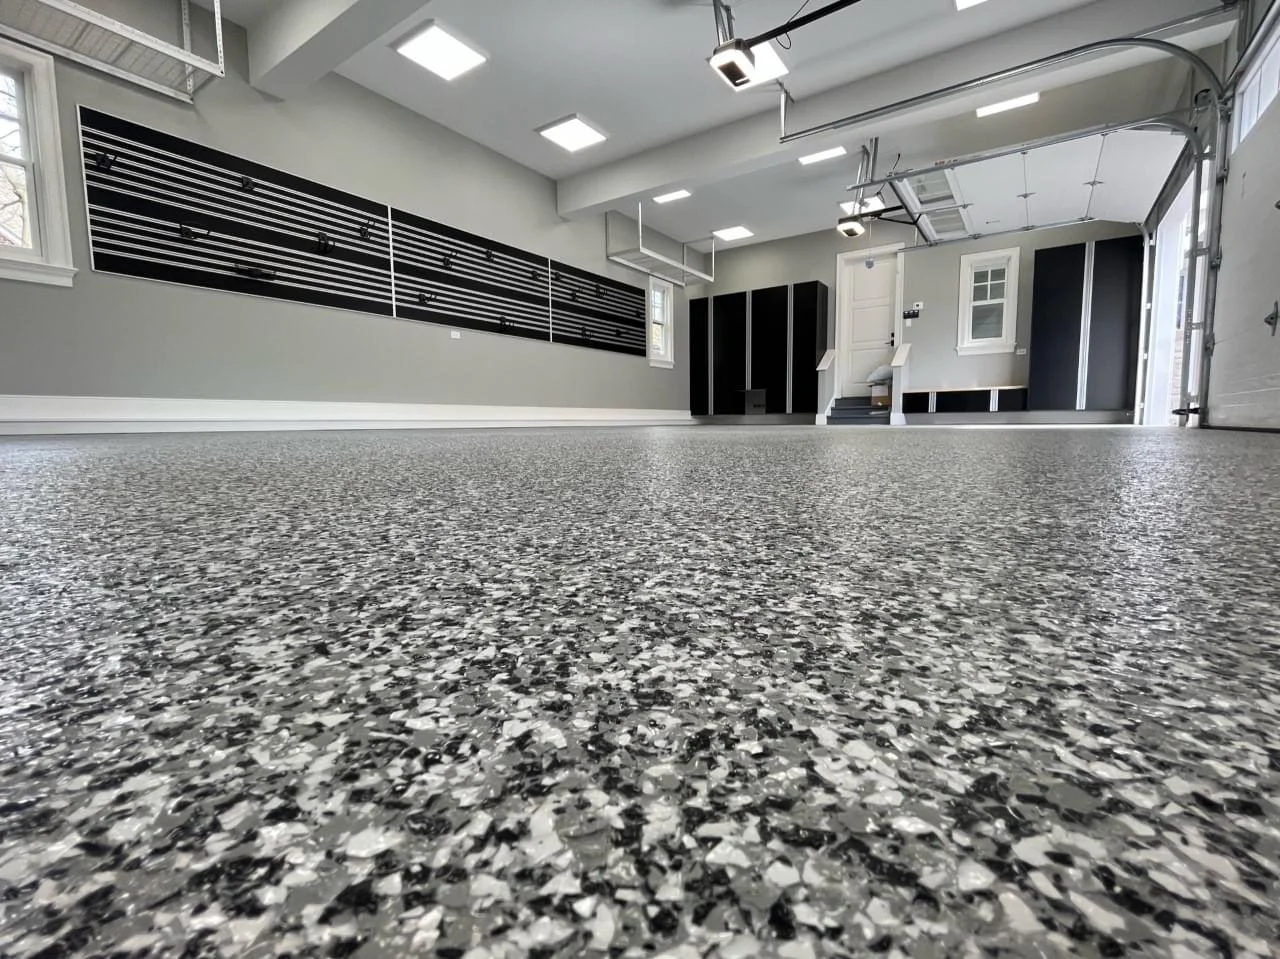
The main differences between polyaspartic and epoxy are cure speed, UV resistance, and concrete adhesion. Polyaspartic cures in just a few hours, leaving behind a flexible, scratch-resistant finish that won't yellow over time. Epoxy fuses into prepared concrete and takes a couple of days to set fully, creating a thick, tough barrier that handles heavy weight and spills.
For most garage floors, the best approach is combining them. Epoxy does the heavy lifting under the surface, bonding to the slab so the floor resists peeling. Polyaspartic sits on top, protecting against sunlight, scratches, and hot tire marks.
Below, we'll walk you through how they compare on cure time, cost, durability, and installation so you can choose what works best for your home.
Table of Contents
- Quick Comparison: Polyaspartic vs. Epoxy
- What Is Epoxy Floor Coating?
- What Is Polyaspartic Floor Coating?
- The 5 Major Differences Between Epoxy and Polyaspartic
- Why the Best Garage Floors Use Both Materials
- How Long Do Epoxy and Polyaspartic Floors Last?
- Maintenance Tips for Both Coatings
- Which Floor Coating Is Right for Your Garage?
Quick Comparison: Polyaspartic vs. Epoxy
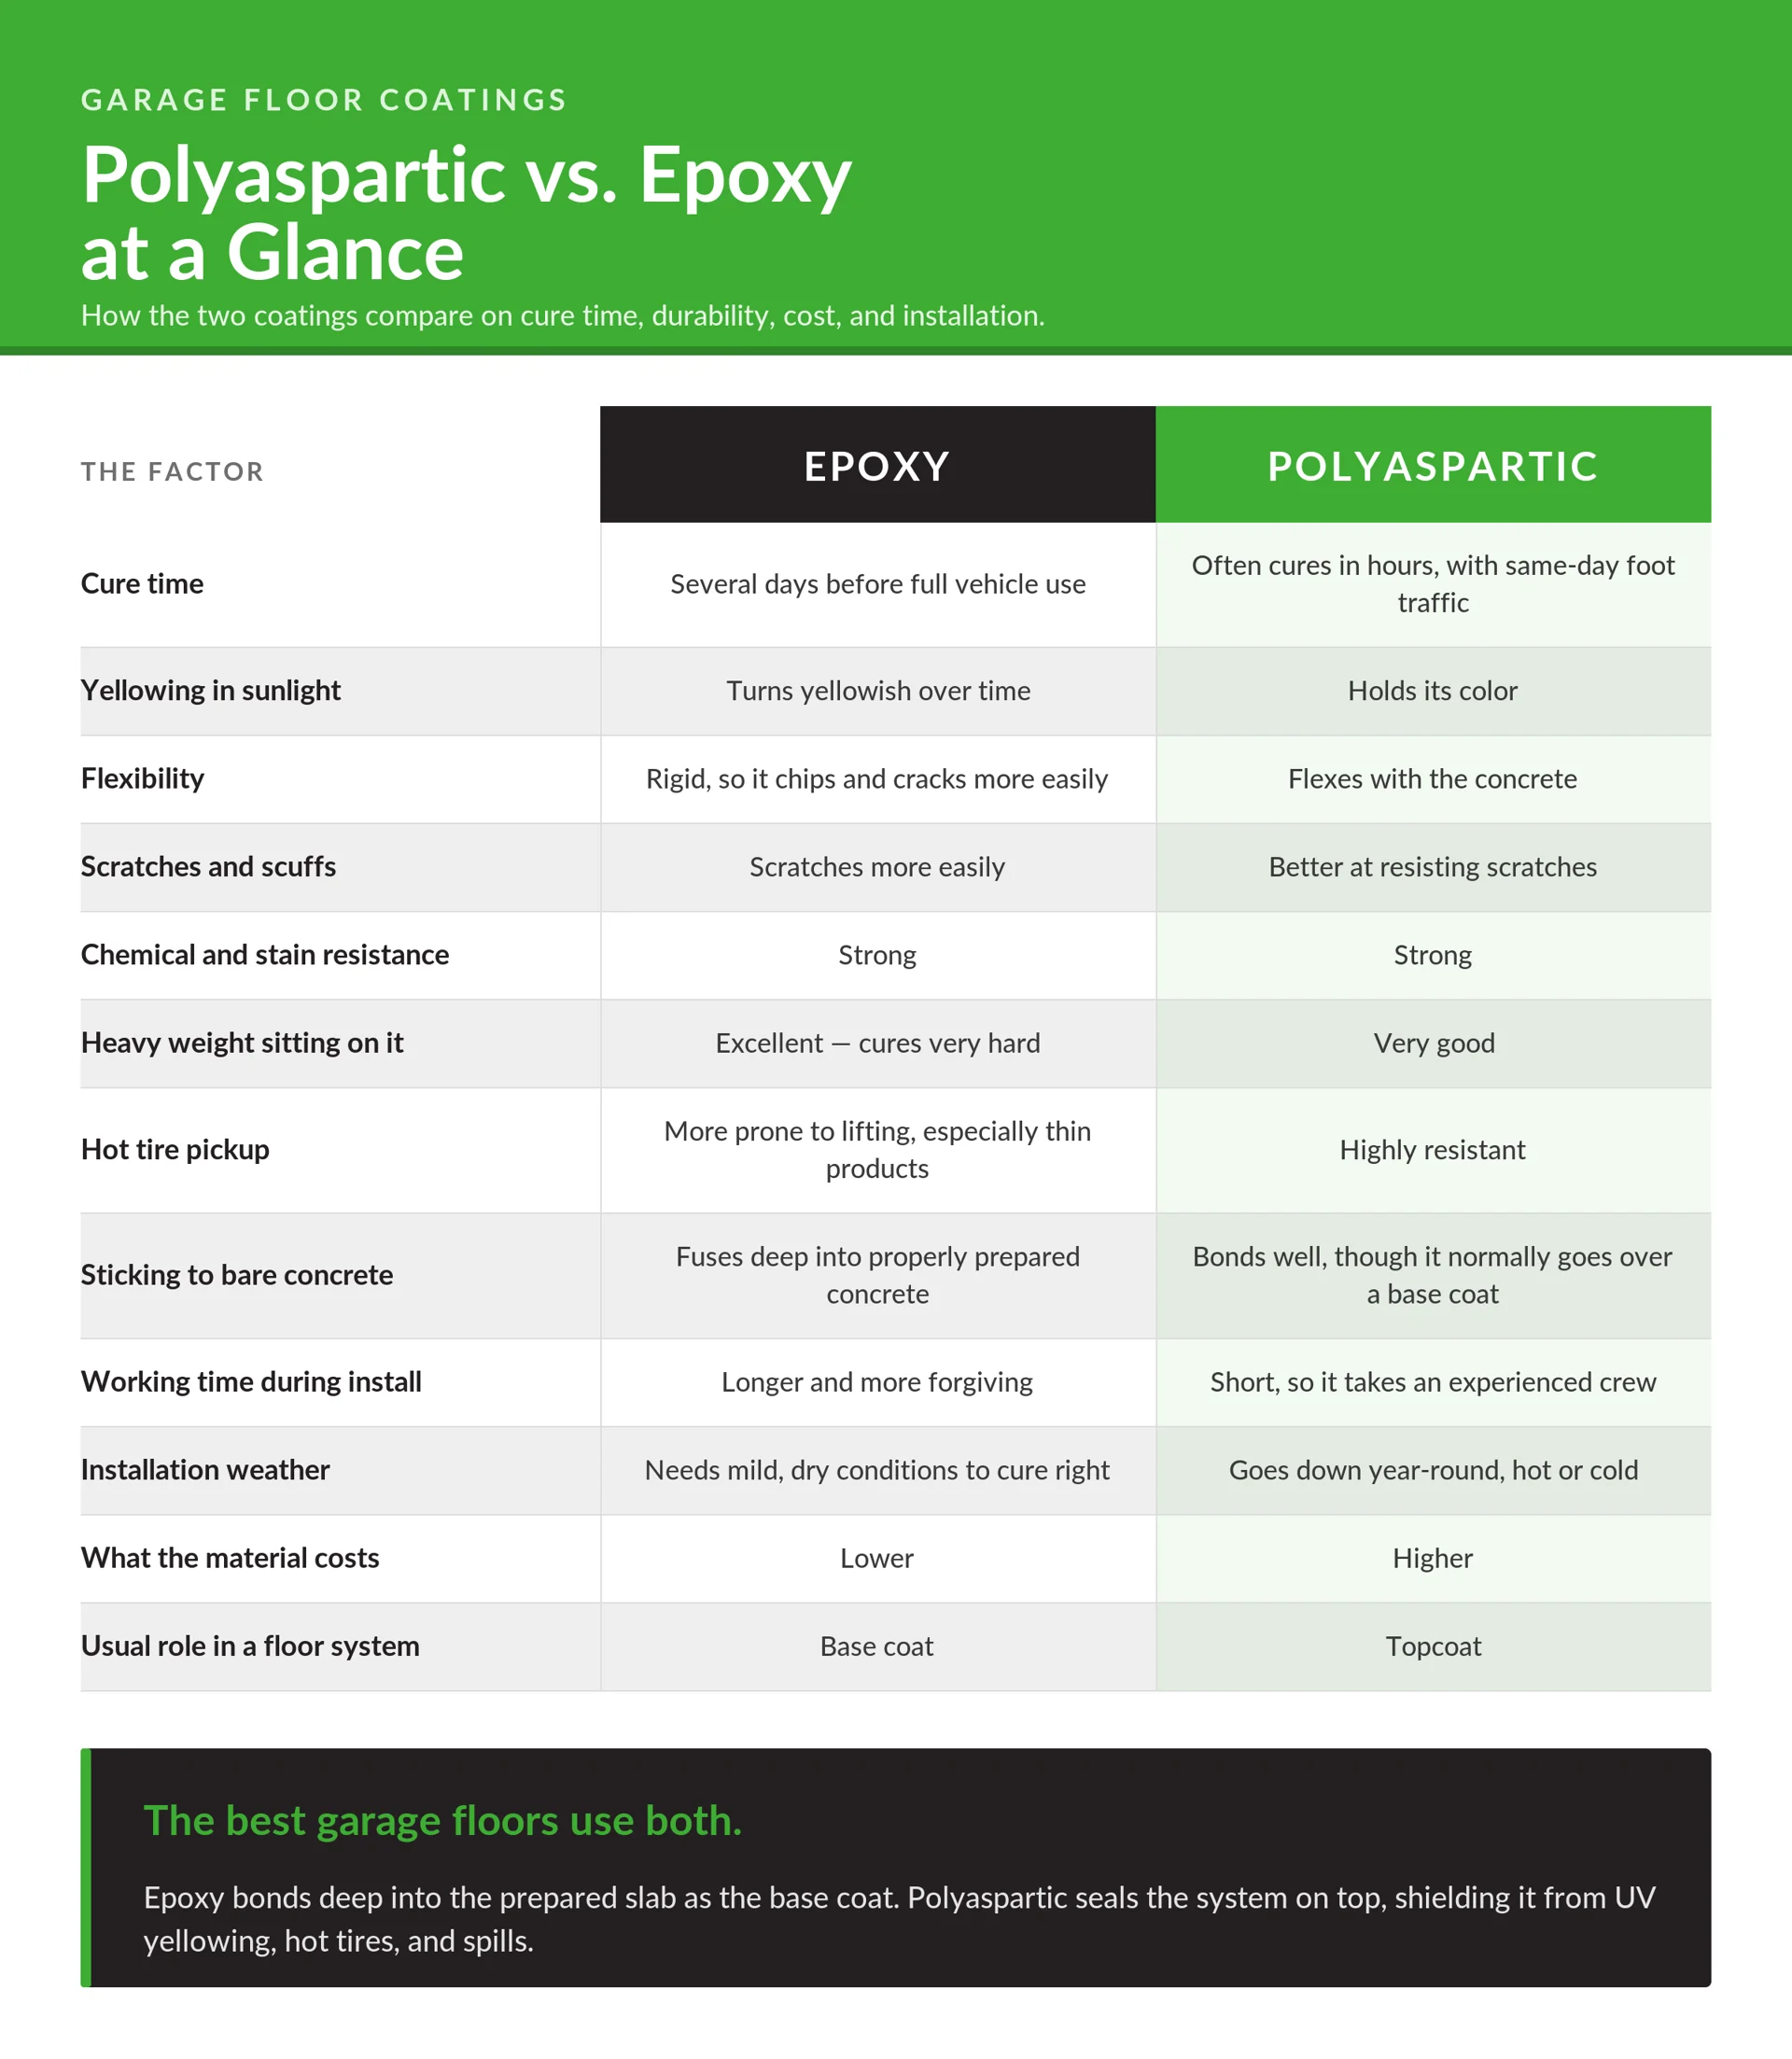
What is Epoxy Floor Coating?
Epoxy is a two-part coating system made of a resin and a hardener. When you mix it on-site, a chemical reaction causes the material to cure into a hard, protective layer over your concrete. It has been the go-to standard for garage floors for decades, which is why most DIY kits you see on store shelves are epoxy-based.
What Epoxy Does Well
- Strong Concrete Adhesion: Epoxy stays wet long enough to sink deep into the concrete's open pores (after proper grinding) rather than just sitting on top. That deep grip is why professionals rely on epoxy as their go-to base layer.
- Thicker Protective Layer: High-solids epoxy lays down a thick, heavy layer in a single coat. This fills in minor surface flaws and rough spots, creating a smooth, solid foundation for your topcoat.
- Chemical Resistance: It easily handles motor oil, transmission fluid, and antifreeze. Spills wipe right up without leaving stubborn stains or ruining the finish.
- Handles Heavy Weight: Once cured, epoxy creates a tough, solid surface that easily supports parked cars, heavy toolboxes, and loaded storage racks without denting.
- Longer Working Time: Because epoxy cures slowly, installers have plenty of time to smooth out roller marks and fix uneven spots before it sets up.
- Budget-Friendly: Epoxy costs less to produce, making it an affordable base to build up thickness and strength at the bottom of a multi-layer floor system.
Where Epoxy Falls Short
- UV Sensitivity: Epoxy breaks down under direct sunlight and slowly turns an amber or yellow tint. If you leave your garage door open or have windows, a gray floor can look noticeably discolored within a couple of years.
- Long Downtime: Each coat has to dry completely before the next one can go down, meaning a standard epoxy job usually takes several days to finish.
- Stiffness: Concrete expands and contracts with changing temperatures, and a stiff coating struggles to move with it. Over time, that strain can cause the coating to crack, peel, or lift right off the slab. DIY jobs are especially vulnerable to this, since skipping proper surface prep or applying the layer too thin makes peeling almost inevitable.
- Hot-Tire Pickup: Warm tires can soften lower-quality epoxy, grip onto it, and pull the coating right off the concrete when you pull out of the garage.
- Smaller Application Window: Most epoxies need specific weather conditions, temperatures, and humidity levels to cure properly, which limits when during the year you can actually install it.
What is Polyaspartic Floor Coating?
Polyaspartic is a newer coating chemistry built for speed and durability. Like epoxy, it’s a two-part system where resin and hardener are mixed on site, but the chemistry is completely different. It sets in hours rather than days, leaving a flexible, scratch-resistant finish that won’t yellow or fade in sunlight.
Because it sets that fast, there’s almost no room to fix a mistake once the material is down. DIY polyaspartic kits do exist, but the 20-to-30-minute working window is why most homeowners who try one end up calling a professional.
What Polyaspartic Does Well
- Fast Cure Time: Polyaspartic sets in just a few hours rather than several days, which is what makes a full, single-day installation possible.
- UV Protection: It won't yellow, fade, or amber under sunlight, so the color you pick stays true for the life of the floor.
- Resists Scratches and Scuffs: It holds up exceptionally well against dragged storage bins, rolling tool chests, and dropped tools with far less scarring than standard epoxy.
- Flexes with Your Slab: Because it stays slightly flexible, it naturally expands and contracts through seasonal temperature swings without cracking or peeling away.
- Year-Round Installation: It cures reliably in a wide range of temperatures, meaning you don't have to wait for mild spring or fall weather to get your floor done.
- Stain and Chemical Resistance: Once cured, the surface becomes non-porous. Automotive fluids, household cleaners, and harsh winter road salts stay on top for easy cleanup instead of soaking in.
Where Polyaspartic Falls Short
- Higher Cost: The raw materials are more expensive to produce, which naturally bumps up the price of the project.
- Short Working Window: Once mixed, polyaspartic only gives installers about 20 to 30 minutes before it sets. Mistakes happen fast and leave very little time to fix them.
- Not DIY-Friendly: The exact speed that makes it great for professional crews makes it completely unforgiving for a weekend DIYer.
- Slippery When Wet: A smooth, high-gloss topcoat can get slick when wet. While decorative flakes add some traction, it’s always a good idea to ask your installer for a non-slip grit additive in the final coat.
- Vulnerable to a Few Harsh Chemicals: While it handles everyday oils and gas with ease, harsh liquids like battery acid or brake fluid can damage the finish if left to sit for too long.
The 5 Major Differences Between Epoxy and Polyaspartic
Cure Time and Downtime
Polyaspartic cures in hours, not days. A professional crew can prep, coat, and finish a standard garage in just a single day, letting you walk on the floor that evening and park your car shortly after. Epoxy, on the other hand, needs 12 to 24 hours to dry between coats and several days to fully cure, meaning you’re typically looking at a 3-to-5-day wait before driving onto it.
When comparing timelines, always ask about the return-to-service time, the exact day you can park your vehicle back in the garage. "Cure time" simply means how long the chemical takes to fully harden behind the scenes, long after it feels dry to the touch. Return-to-service is always a longer wait, and cold weather can stretch both numbers out even further.
UV Stability and Color
Epoxy yellows in sunlight; polyaspartic doesn't. This is easily the most noticeable performance gap between the two floor coatings.
If any natural light hits your floor, whether from an open garage door, windows, or an outdoor patio space, your topcoat needs to be UV stable. While some high-end epoxies contain additives to slow down yellowing, they can't stop it completely over time.
Flexibility, Cracking, and Hot Tire Pickup
Epoxy cures into a very hard, rigid surface. That stiffness is actually one of its biggest strengths; it’s what allows epoxy to hold up under massive weight and lock tightly into the concrete. The tradeoff is less flexibility at the surface. While chipping is rare on a well-installed floor, it usually happens when a heavy tool drops from a workbench, the slab wasn't ground properly during prep, or underlying concrete cracks move beneath it.
Polyaspartic retains a little bit of flexibility after it cures, allowing it to naturally expand and contract with the concrete rather than fighting it. That built-in give is also why polyaspartic handles hot tires so well; warm rubber simply can't grab hold of or pull up a flexible, fast-cured surface.
Cost and What Drives Your Estimate
Polyaspartic tends to cost more than epoxy, but the resin price itself is only one piece of your final estimate.
In fact, overall pricing between the two often overlaps significantly because these real-world factors usually drive the bill far more than the material choice:
- Concrete Condition: Deep cracks, surface pits, oil stains, and old peeling paint require extra prep time before any coating can go down.
- Garage Size: A 3-car layout naturally requires more material and labor hours than a 1-car space.
- System Design: A single thin coat and a full multi-layer system are both sold as coatings, so the word alone tells you nothing.
- Flake Coverage: Covering the floor completely in flake uses far more material than a light scatter.
- Labor Days: Multi-day epoxy installations cost more in labor, which often narrows the total price gap between the two systems.
A high-grade, multi-layer epoxy system can easily cost more than a thin, budget polyaspartic application. That’s why it’s always best tocompare complete installation packages, prep quality, layer thickness, flake coverage, and labor, rather than focusing on the product name alone.
Installation Difficulty and DIY Potential
Epoxy is much more forgiving for a hands-on homeowner; polyaspartic is strictly a professional product. Epoxy gives you a longer working time, meaning you have room to reload a roller or smooth out runs before the batch sets up in the bucket. Polyaspartic cures so fast that any mistake hardens almost instantly.
Surface prep causes far more floor failures than product choice. Simple acid washing or pressure washing just can't open up concrete pores the way industrial diamond grinding does. Skipping proper mechanical prep is the main reason professionals get called out to repair failed weekend projects.
When DIY coatings fail, they almost always show the same red flags:
- Peeling at the door entrance, where sunlight, rain, and temperature swings constantly attack the exposed edge.
- Tire track lifting, where hot tires pull the coating right off the bare slab in two neat strips.
- Surface bubbles, caused by moisture vapor pushing up through an unsealed slab.
- Flaking along walls and corners, where small rental grinders couldn't reach during prep.
That's why hiring a professional installer is usually the safest path to a floor that actually lasts. Pros bring the heavy-duty grinding gear and experience needed to handle the prep correctly, which is the single most important factor in how your floor looks and holds up years down the road.
Why the Best Garage Floors Use Both Materials
The best garage floors use both materials because combining them gives you the deep, permanent adhesion of epoxy alongside the UV-stable, fast-curing protection of polyaspartic. Relying on just one material forces you to sacrifice either long-term bond strength or surface durability.
A hybrid flooring system gives you both by letting each material do what it does best.
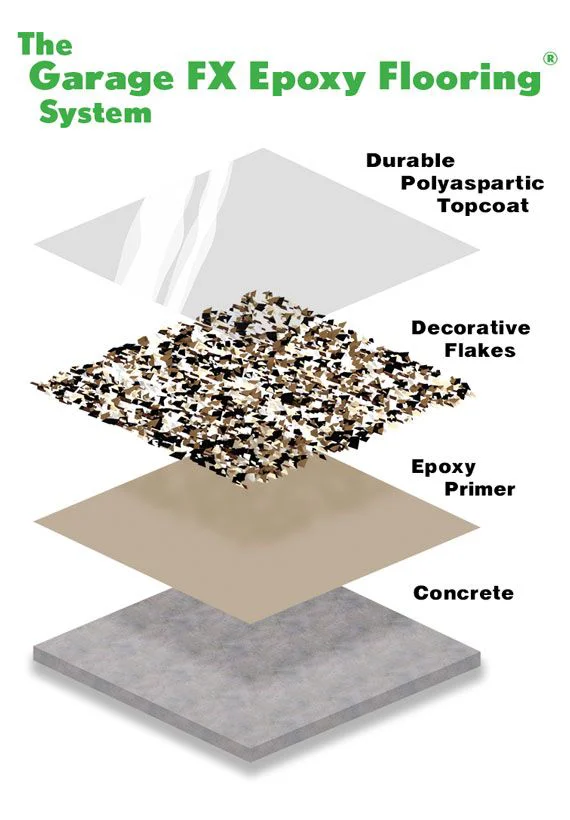
Here’s how both coatings work together in one system:
The epoxy goes down first, soaking deep into the prepared concrete slab to build a permanent, heavy-duty foundation that won't peel or lift under heavy loads.
While that base coat is still wet, decorative flakes are scattered across the floor to add texture, slip resistance, and a clean finish that hides minor concrete flaws.
Finally, a polyaspartic topcoat seals the entire system, shielding the epoxy from UV yellowing, hot tires, and chemical spills while curing fast enough to get your garage back in a single day.
Here is a look at how both layers stack together to create a complete garage flooring system:
How Long Do Epoxy and Polyaspartic Floors Last?
Lifespan estimates for garage floor coatings can vary widely. A professionally installed epoxy floor typically lasts 10 to 20 years, while a professionally installed polyaspartic floor can last 20 to 25 years.
Where your floor lands in that range depends far less on the coating itself and much more on the quality of the installation and these key factors:
- Surface Preparation: Mechanical grinding opens up the concrete so the coating can lock in deep. Proper prep, along with repairing cracks before coating, is the single biggest factor in preventing peeling.
- Slab Moisture: Concrete naturally breathes moisture vapor from the ground underneath. If that vapor pressure is too high, the floor will eventually bubble and lift. Always ask if your installer tests for moisture before applying any coating.
- Product Grade and Thickness: Cheap DIY coatings are heavily thinned down with water or solvents, meaning much of the product evaporates as it dries. A thick, high-solids coating leaves behind a solid layer that lasts.
- Daily Usage: Driving your car in and out every day, rolling heavy tool chests, and sliding metal lawn furniture will wear a finish much faster than plastic storage bins sitting quietly in a corner.
- Sunlight and Climate: Direct sunlight breaks down coatings that aren't UV-stable, while freeze-and-thaw cycles force the concrete slab underneath to constantly expand and contract.
- Ongoing Maintenance: Dirt, sand, and road grit act like fine sandpaper under vehicle tires and gradually dull the finish over time. Regular cleaning keeps the surface protected, while wiping up chemical spills promptly prevents staining.
At the end of the day, two floors coated with the exact same material can have drastically different lifespans. The quality of the prep and the experience of the installation crew matter just as much as the coating itself.
Maintenance Tips for Both Coatings
Both options are far easier to maintain than bare concrete, and neither ever needs waxing or resealing. A simple broom or dust mop takes care of everyday dust, while a damp mop with a mild cleaner handles mud and heavier dirt.
Spills are equally painless to manage. Because both materials create a non-porous surface, oil, gasoline, and winter road salts sit right on top rather than soaking deep into the slab. However, it’s always best to wipe up harsh chemicals promptly and avoid using aggressive acid cleaners unless your floor's manufacturer recommends them.
If a polyaspartic topcoat eventually begins to show light scratches or dullness after years of heavy use, you usually don't have to tear out the whole floor. A professional crew can simply scuff the top layer and apply a fresh topcoat right over it, giving you a brand-new finish for a fraction of the cost of starting from scratch.
For a deeper dive into keeping your floor looking brand new, check out our guide on How to Clean and Maintain an Epoxy Garage Floor.
Which Floor Coating Is Right for Your Garage?
For a topcoat, polyaspartic outshines epoxy in almost every residential garage. It holds its color without yellowing, lets you return to using your space much sooner, and resists everyday scratches and hot-tire pickup far better. That durability is essential for a room where the doors roll open to direct sunlight and vehicles are parked daily.
For a base coat, epoxy is still the top performer. Because it cures slowly and bonds deeply into properly prepped concrete, it creates the reliable foundation that the rest of your flooring system relies on.
If you are set on choosing just a single-material system:
- Polyaspartic makes the most sense if quick turnaround, UV resistance, and maximum scratch protection are your top priorities.
- Epoxy works best if you want to keep initial project costs down and need a thick, heavy-duty surface in a garage with minimal direct sunlight.
For most homeowners, however, you don't have to compromise. The strongest, longest-lasting option is a hybrid flooring system that uses both, combining the deep adhesion of epoxy with the surface protection of polyaspartic.
Get the Best of Both Coatings with GarageExperts®
You shouldn't have to choose between the benefits of an epoxy or polyaspartic coating.
At GarageExperts®, our Garage FX® flooring system pairs both coatings together, letting each layer do what it does best. Our specialized fusing primer penetrates deep into your concrete slab delivering up to three times stronger adhesion than standard epoxy, while our durable polyaspartic topcoat handles UV rays, tire marks, and chemical spills on the surface. The result is an industrial-grade floor system built for how you actually use your garage, not just how it looks on day one.
Contact your local GarageExperts® to request a free on-site estimate. We'll evaluate your concrete, walk you through 140+ custom flake colors and finishes, and design a floor tailored specifically to your home.